Tuesday 22 May 2012

The Auld Empty Barn...

This was my entry for the Group Build over on The Guild , the theme was "Building", which could be any sort of manmade structure.
The barn is actually an OO scale paper model which has been reinforced with various sorts of card and foamcore. The original was downloaded from Scalescenes .
The cows are 1/72 plastics from Pegasus.

Friday 11 May 2012

German Heavy Metal Hammers the British

Now I'm not busy with the Hawker Typhoon build, I can post some pictures of our last Kampfgruppe Normandy game which was played way back on Anzac Day.
My opponent the Rajah said he didn't want any artillery in this game apart from AT guns- rats.
The battle showed that fighting through bocage country against Germans lying in wait is very difficult and costly for allied armour in particular. It also demonstrated that I could have been far more aggressive in my use of infantry, with my British sections proving more resilient than expected. It also highlighted why the British relied so heavily on stonks to soften the enemy.
Our troops were brought on over three turns using the escalation concept. After setting up the table we diced for who would get choice of starting position- the Rajah won and chose the end closest to the village, this allowed him to rush his extra recce troops in and establish a firm foothold. By the time the British were getting close enough for an assault the Germans, including their heavy armour were well ensconced in the village.
The Germans did horrendous damage to my armour and my dice rolls for my AT guns & AFVs were shocking. I did manage to blow up a Schwimwagen with my 3" mortar as part of a building collapsed on it. I also managed to wipe out his recce infantry who were holding the garage & occupy the building. Overall it was a victory to the Germans, largely because of the mass destruction they caused to my armour.

Saturday 5 May 2012

Finished Typhoon

Well I've brought the Typhoon to completion, apart from one little extra. I was hoping to create a flight stand using a telescopic aerial I salvaged but I forgot to pre-drill a hole in the fuselage to stick it in. My other idea was to affix a rare earth magnet to the underside and stick the aerial to that. My question is does anyone have a rare earth (small but powerful) magnet they could spare? I thought there's no point buying a whole packet when I only need one.

Anyway apart from that I've finished.

Went and saw the Avengers movie with my son today, it was great, lots of laughs too.

Enjoy the pictures. You may notice I still managed to get glue smudges on the canopy- I tried really hard not to. The whole thing had a coat of Testors Dullcoat, and then the canopy was glued on. I had to use some PVA to fill some unsightly gaps where the canopy meets the cockpit area- so a heads up for the other blokes who are building this kit. Mine is not a museum quality build, I'll admit it, but it serves my purpose of providing the Brtitish with air support on the wargames table.

Friday 4 May 2012

Day Four of Hawker Typhoon Build...closer 'n closer...

Had a more leisurely evening, mainly because I gave the Typhoon a coat of satin acrylic varnish and it took a while to dry:


As you can see I used Jo Sonja's Acrylic Satin Varnish- works for me. This was a preparation for putting on the decals, plus providing a bit more protection to the model.

Once this was dry I applied the decals:


I'll do a bit more tomorrow- but not too much as my son & I are planning to go to the pictures to see the new Avengers movie in 3D...cool....:)

Thursday 3 May 2012

Day Three Typhoon Build- Getting Closer....

G'day everyone,
another evening's work to post.
Did some masking, painting and chopping tonight.
I went with Nick's suggestion of chopping off the propellors for that sleek wargames friendly look, and changed the nose colour from beige green to a more striking yellow.
Quite happy with how the Invasion Stripes came out- part masking & part hand painted.
Painted back over all the surfaces to get a better coverage & mixed up a darker grey for the top surfaces.
Thought about masking up cockpit canopy to paint on framework, but in the end managed a reasonable result with Windsor & Newton 000 Series 7 & Bronze Green paint.

Here's the pictures:

Canopy
Stay Tuned....and have fun my fellow builders.

Wednesday 2 May 2012

Day Two of Typhoon Group Build

Ok, finally got some more done this evening on the Typhoon.
I think the painting will definitely be the most time consuming aspect of this build.
Having second thoughts about the nose/props, they are wobbly, despite my best efforts to make them "spinable"- I think I'll just glue 'em in place, also considering Nick's idea of doing away with props altogether, for that sleek wargames look.

So here we are then:


After getting it to this stage I applied ( "slopped over") my wash formula- 50/50 Umber & Blue Vallejo Wash. It surely has that hand painted- I don't have an airbrush- look :)
The photos with the wash applied show it still wet.


Can you guess what it is yet? ;)

Tuesday 1 May 2012

Day One- Hawker Weather Themed Aircraft- Group Build

Yes it's day one of the build, and I can see Paul & Nick have wasted no time in posting.

I also came across the same problem as Nick with the wheels not being designed to be modelled as retractable on my Airfix Typhoon 1B. So I've had to chop them about a bit so I could get them to tuck away.
My plan will be to have the plane mounted on an old telescopic antenna from a remote control box, so I will have to drill a hole in the fuselage undercarriage, stick the antenna in and tidy up with modelling putty.
I've also noticed that the cockpit is very basic, so I may have to paint some framework on the cockpit glass (not sure if I'm using the right terminology). At least the pilot was easy to paint.

Ready to Start!

It's a fairly simple kit without many parts, but does need a bit of tidying up- I guess it's pretty old by now.
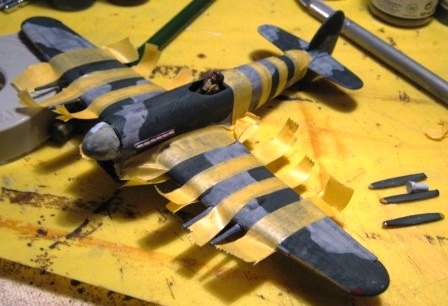
This is the result so far from my first nights work.
The Tyffie has had a basic undercoat of light grey, plus I painted the pilot, the nose & props. I forgot to take a picture of underneath, but it's basically the same as one of the pictures on Nicks blog.

Here's a close up of Algy in his Typhoon. Go get those Jerries little man!

And so ends my first days efforts, don't forget to see what the other blokes are up to as well.

17th Century Characters...mostly

 Here are some 17th Century character miniatures I finished recently.  28mm metal, mostly from Wargamer Poland: https://sklep.wargamer.pl/gb...